
Improving Code Quality Of Android Apps With SonarQube And Gradle Detekt
As a developer, you want to implement the best code quality. With these two tools, you can achieve it fast and without much effort.
Code quality is very important and you should always try to optimize your implementation. This article shows two tools that can be combined to achieve better quality, especially in android apps.
1. Introduction
Some weeks ago I found a nice tutorial about SonarQube. Because I am a great fan of improving my code quality or the quality of projects I am working on I created an instance of SonarQube myself and used it to check and improve the code quality of several android apps.
The following article shows a how-to that can be executed by anybody if a running Docker Swarm exists (learn how to create one here).
I also provide a Dockerfile for local development in the end.
2. SonarQube
What is SonarQube?
SonarQube is an open-source platform developed by SonarSource for continuous inspection of code quality to perform automatic reviews with static analysis of code to detect bugs, code smells, and security vulnerabilities on 20+ programming languages.
2.1. Installation
The following docker-compose.sq.yml can be used to create a SonarQube instance within a Docker Swarm
version: "3.7"
services:
  sonarqube:
    image: sonarqube:latest
    depends_on:
      - db
    networks:
      - default
      - traefik-public
    environment:
      SONAR_JDBC_URL: jdbc:postgresql://db:5432/sonarqube
      SONAR_JDBC_USERNAME: sonar
      SONAR_JDBC_PASSWORD: sonar
    volumes:
      - data:/opt/sonarqube/data
      - extensions:/opt/sonarqube/extensions
      - logs:/opt/sonarqube/logs
      - temp:/opt/sonarqube/temp
    restart: on-failure
    container_name: sonarqube
    deploy:
      placement:
        constraints:
          - node.labels.sonarqube == true
      labels:
        - traefik.enable=true
        - traefik.docker.network=traefik-public
        - traefik.constraint-label=traefik-public
        - traefik.http.routers.sonarqube-http.rule=Host(`sq.${PRIMARY_DOMAIN?Variable not set}`)
        - traefik.http.routers.sonarqube-http.entrypoints=http
        - traefik.http.routers.sonarqube-http.middlewares=https-redirect
        - traefik.http.routers.sonarqube-https.rule=Host(`sq.${PRIMARY_DOMAIN?Variable not set}`)
        - traefik.http.routers.sonarqube-https.entrypoints=https
        - traefik.http.routers.sonarqube-https.tls=true
        - traefik.http.routers.sonarqube-https.tls.certresolver=le
        - traefik.http.services.sonarqube.loadbalancer.server.port=9000
        - traefik.http.routers.sonarqube-https.middlewares=security-headers
  db:
    image: postgres
    networks:
      - default
    environment:
      POSTGRES_USER: sonar
      POSTGRES_PASSWORD: sonar
      POSTGRES_DB: sonarqube
    volumes:
      - psql:/var/lib/postgresql
      - psql_data:/var/lib/postgresql/data
    restart: on-failure
    container_name: postgresql
    deploy:
      placement:
        constraints:
          - node.labels.sonarqube.db == true
networks:
  traefik-public:
    external: true
  default:
    external: false

volumes:
  data:
  extensions:
  logs:
  temp:
  psql:
  psql_data:
To start SonarQube the used environment variable within the docker-compose.sq.yml have to be exported:
$> export PRIMARY_DOMAIN=knulst.deAfterward, the stack can be deployed
$> docker stack deploy -c docker-compose.sq.yml sonarqubeand it will be accessible at https://sq.knulst.de.
To run SonarQube you need to increase the memory limit with the following command.
sysctl -w vm.max_map_count=262144(In windows you have to start the WSL shell: wsl.exe -d docker-desktop)
2.2. Configuration
Now you can log into the web dashboard (default user/pass = admin/admin) and start the configuration process. To use this SonarQube instance in any android app a login token has to be created within the user profile at https://sq.knulst.de
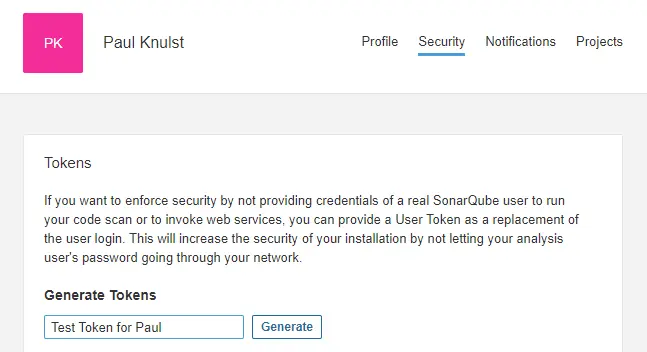
After this token is created three files have to be adjusted:
build.gradle(project)build.gradle(app)gradle.properties
The first addition is needed within the projects build.gradle. It is important to add at the root level:
plugins {
    id "org.sonarqube" version "2.8"
}
Secondly, a new block should be created within the app build.gradle:
sonarqube {
    properties {
        def activeFlavor = "testFlavor1"
        def libraries = project.android.sdkDirectory.getPath() + "/platforms/android-28/android.jar"

        property "sonar.language", "kotlin"
        property "sonar.sources", "src/main/java, src/$activeFlavor/java"
        property "sonar.binaries", "build/intermediates/classes/$activeFlavor/debug"
        property "sonar.libraries", libraries
        property "sonar.java.libraries", libraries
        property "sonar.tests", "src/test/java, src/androidTest/java"
        property "sonar.log.level ", "DEBUG"
        property "sonar.java.test.binaries", "build/intermediates/classes/$activeFlavor/debug"
        property "sonar.java.test.libraries", libraries
        property "sonar.junit.reportsPath", "build/test-results/Debug"
        property "sonar.android.lint.report", "build/outputs/lint-results.xml"
    }
}
It is important to know that this block is used by an app written with Kotlin which has several flavors. To use this code block the activeFlavor and sonar.sources have to be adjusted.
Additionally, two more lines have to be inserted into the app build.gradle:
1. Add SonarQube package to dependencies:
implementation "org.sonarsource.scanner.gradle:sonarqube-gradle-plugin:3.3"2. Apply the SonarQube plugin:
apply plugin: 'org.sonarqube'3. The last step is to add the Token, the URL, and a project name into the gradle.properties:
# Sonarqube Login Token
systemProp.sonar.host.url=https://sq.knulst.de
systemProp.sonar.login=YOUR_TOKEN_HERE
systemProp.sonar.projectName=Android Test App
systemProp.sonar.projectKey=Android-Test-App
2.3. Analyzing code quality with SonarQube
After executing the prior explained steps the analysis can be run within a terminal (or in android studio):
$> gradle sonarqubeOn the project overview at the SonarQube website there should be a project overview after the command execution is finished:

3. Gradle detekt
What is detekt?
detekt is a static code analysis tool for the Kotlin programming language. It operates on the abstract syntax tree provided by the Kotlin compiler.
Detekt can be implemented in any Kotlin-based android app. It can be used with a self-defined set of rules to check an app. Enabling detekt is very easy and can be done in four steps:
- Add detekt to project
build.gradle
dependencies {
    [...]
    classpath("io.gitlab.arturbosch.detekt:detekt-gradle-plugin:1.17.0")
}
2. Create a detekt.yml with a defined set of rules. Download a sample file here and store it within project_folder/detekt/detekt.yml
3. Apply the detekt plugin in app build.gradle
apply plugin: "io.gitlab.arturbosch.detekt"4. Add detekt block to app build.gradle
detekt {
    toolVersion = "1.17.0"
    buildUponDefaultConfig = false
    allRules = false
    config = files("../detekt/detekt.yml")
    baseline = file("../detekt/baseline.xml")
    input = files("src/main/java/com")
    debug = false
    reports {
        html {
            enabled = true
            destination = file("build/reports/detekt.html")
        }
        xml {
            enabled = true
            destination = file("build/reports/detekt.xml")
        }
        txt.enabled = false
        sarif.enabled = false
    }
Now a detekt report can be generated by executing:
$> gradle detekt4. Combining both tools
After enabling both tools it is possible to combine them. To achieve this the only thing which has to be done is to add the following line of code to the SonarQube block:
sonarqube {
    properties {
            [...]
            property "sonar.kotlin.detekt.reportPaths", "build/reports/detekt.xml"
            }
}
Now it is possible to create an informative project entry on SonarQube website by executing:
$> gradle detekt
$> gradle sonarqube
After finishing both commands the project summary is accessible at https://sq.knulst.de/projects and will show all found problems!

This image shows an example of a bad codebase and if compared to the other overview it shows several more code smells which were added because of the detekt report.
5. Closing Notes
I hope you enjoyed reading this article and will now use these tools to improve your code quality. Keep in mind that software that has high quality can be maintained and enhanced more easily!
For local development, you can use this docker-compose and these notes to know what you have to change.
Feel free to connect with me on Medium, LinkedIn, and Twitter.
🙌 Support this content
If you like this content, please consider supporting me. You can share it on social media, buy me a coffee, or become a paid member. Any support helps.
See the contribute page for all (free or paid) ways to say thank you!
Thanks! 🥰